Wood Mirror
Hey friends!
We’re back! Oh it feels so good to be home. We had some great trips, but we are so thrilled to be back home with our families and tools of course!
Today I am sharing a super quick way to dress up a boring mirror. I have been wanting to find a cute mirror for my son’s bathroom without breaking the bank… So, I decided to make it instead! Here is how it turned out!
I am giving measurements off of my mirror, which I found at Walmart. This idea can be used on any blank mirror with a few modifications on size!
So… Here is my not so amazing $9 mirror I found at Walmart!
My first step was to disassemble this. I will say… If you make it past this part, you are good to go! I started by unscrewing the hardware and removing the cardboard backing. It was just stapled on. I then noticed that the mirror is actually glued to the inside. I attempted to use a utility knife to cut the dry glue, but didn’t have much luck with that. I found the easiest way to remove the frame was to carefully pull the frame away from the mirror towards myself one side at a time. Then, it easily pulled off! Remember… Every mirror is different so just take your time on this part!
Now for the wood! You will only need 2 pieces of wood for this project!
1 – 2x4x8 piece of pine
1 – 1×3 piece of pine at least 4′ long
That puts the cost of wood UNDER $5! Now we are speaking my language!
First, cut your 2×4 into 4 pieces like this…
For those of you without a saw, you can also have the guy at Lowe’s or HD cut it for you! We are super excited to start sharing some video tutorials on our tools. Our saws will be the first one! We should start sharing those in the next week or so… Woohoo!
There are different ways to attach your frame on this next part, but I decided to use my Kreg Jig® to join mine. I know many of you may still have your Kreg Jig® hiding away in it’s box. Dust it off! This is such a great beginner’s project! We will also be sharing a video on this guy soon!
First, I added 1 1/2″ pocket holes to my smaller boards. I put 2 on each end.
Next, I attached my smaller boards to the longer ones using 2″ pocket hole screws. This is what the back of the frame will look like…
For the top and the bottom, I cut my 1×3 into 2 pieces that were the length of the top and bottom of the frame. Mine was 20 7/8″ long. I would suggest you measure your completed frame before cutting these pieces! That way it’s a perfect fit.
I used our new, MOST FAVORITE tool yet to attach the pieces on this part!
Let me introduce you toRyobi’s AirStrike 18-Volt One+ Brad Nailer
This thing is too legit to quit. Forget lugging around an air hose and compressor. All you do is attach an 18v battery to this baby and you are set to go! It can use up to 2″ long brad nails. It uses the same battery packs as our drills making this tool a no brainer. You will LOVE it and thank us for suggesting it! Ryobi hit the nail on the head with this one ;-)… Sorry. Had to. Couldn’t stop myself.
Once you have glued and nailed those two pieces you are ready for stain! I used one of my very favorites.
Rust-Oleum Ultimate Wood Stain in Dark Walnut
You can find this stain at Lowe’s. It’s the best stain out there! It only requires one coat and it dries in under an hour.
After that dried I was ready to attach my black mirror to the back.
I decided to use Gorilla Glue Epoxy for this part. You just squeeze a bit into the mixing tray and use the stick to mix it really good. Then, dab it onto the wood where the mirror will lay.
I laid my mirror on top of the wood like this and used Gorilla Tape to cover the mirror edges. This serves two purposes! It holds the mirror in place until it dries, and it also covers up the edge of the glass. It sticks to the wood and glass great. Love this stuff.
Here is what the back of the mirror looks like now.
And, I just used the hardware from the original mirror and screwed it right back on. I hung the mirror from these D-rings onto screws in the wall. You will want to anchor if your screws aren’t going into a stud.
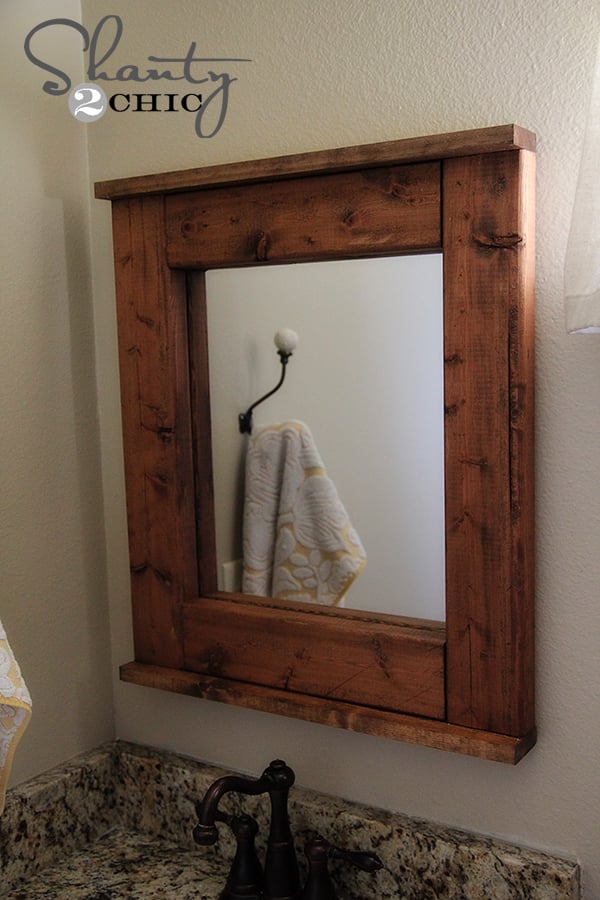
That’s it! Here it is hanging in the bathroom…
Thanks so much for stopping by! It’s so good to be back!
And if you missed it… This bad boy cost me $15 to build. Woohoo!
I would love for you to share and pin this below! You guys are great! ?
~Whitney
We’re back! Oh it feels so good to be home. We had some great trips, but we are so thrilled to be back home with our families and tools of course!
Today I am sharing a super quick way to dress up a boring mirror. I have been wanting to find a cute mirror for my son’s bathroom without breaking the bank… So, I decided to make it instead! Here is how it turned out!
I am giving measurements off of my mirror, which I found at Walmart. This idea can be used on any blank mirror with a few modifications on size!
So… Here is my not so amazing $9 mirror I found at Walmart!
My first step was to disassemble this. I will say… If you make it past this part, you are good to go! I started by unscrewing the hardware and removing the cardboard backing. It was just stapled on. I then noticed that the mirror is actually glued to the inside. I attempted to use a utility knife to cut the dry glue, but didn’t have much luck with that. I found the easiest way to remove the frame was to carefully pull the frame away from the mirror towards myself one side at a time. Then, it easily pulled off! Remember… Every mirror is different so just take your time on this part!
Now for the wood! You will only need 2 pieces of wood for this project!
1 – 2x4x8 piece of pine
1 – 1×3 piece of pine at least 4′ long
That puts the cost of wood UNDER $5! Now we are speaking my language!
First, cut your 2×4 into 4 pieces like this…
For those of you without a saw, you can also have the guy at Lowe’s or HD cut it for you! We are super excited to start sharing some video tutorials on our tools. Our saws will be the first one! We should start sharing those in the next week or so… Woohoo!
There are different ways to attach your frame on this next part, but I decided to use my Kreg Jig® to join mine. I know many of you may still have your Kreg Jig® hiding away in it’s box. Dust it off! This is such a great beginner’s project! We will also be sharing a video on this guy soon!
First, I added 1 1/2″ pocket holes to my smaller boards. I put 2 on each end.
Next, I attached my smaller boards to the longer ones using 2″ pocket hole screws. This is what the back of the frame will look like…
For the top and the bottom, I cut my 1×3 into 2 pieces that were the length of the top and bottom of the frame. Mine was 20 7/8″ long. I would suggest you measure your completed frame before cutting these pieces! That way it’s a perfect fit.
I used our new, MOST FAVORITE tool yet to attach the pieces on this part!
Let me introduce you toRyobi’s AirStrike 18-Volt One+ Brad Nailer
This thing is too legit to quit. Forget lugging around an air hose and compressor. All you do is attach an 18v battery to this baby and you are set to go! It can use up to 2″ long brad nails. It uses the same battery packs as our drills making this tool a no brainer. You will LOVE it and thank us for suggesting it! Ryobi hit the nail on the head with this one ;-)… Sorry. Had to. Couldn’t stop myself.
Once you have glued and nailed those two pieces you are ready for stain! I used one of my very favorites.
Rust-Oleum Ultimate Wood Stain in Dark Walnut
You can find this stain at Lowe’s. It’s the best stain out there! It only requires one coat and it dries in under an hour.
After that dried I was ready to attach my black mirror to the back.
I decided to use Gorilla Glue Epoxy for this part. You just squeeze a bit into the mixing tray and use the stick to mix it really good. Then, dab it onto the wood where the mirror will lay.
I laid my mirror on top of the wood like this and used Gorilla Tape to cover the mirror edges. This serves two purposes! It holds the mirror in place until it dries, and it also covers up the edge of the glass. It sticks to the wood and glass great. Love this stuff.
Here is what the back of the mirror looks like now.
And, I just used the hardware from the original mirror and screwed it right back on. I hung the mirror from these D-rings onto screws in the wall. You will want to anchor if your screws aren’t going into a stud.
That’s it! Here it is hanging in the bathroom…
Thanks so much for stopping by! It’s so good to be back!
And if you missed it… This bad boy cost me $15 to build. Woohoo!
I would love for you to share and pin this below! You guys are great! ?
~Whitney
| Created by | Shanty 2 Chic |
| Price | Free |
| Views | 29 |
Member functions
Login or register to rate, favorite and comment on plans