Canopy Bed
This DIY Canopy Bed can be built with just a few basic tools and about $375 in lumber! We share the free plans, how-to video and a step-by-step tutorial so you can build your own!
I am so excited about my new DIY Canopy Bed! I’ve always loved the vibe a four-poster bed gives a room but I’ve never owned one because I was afraid it would make my room look smaller with the bed posts running up towards the ceiling.
I’ve been wanting to build a new bed so I was looking online for inspiration when I found a few canopy bed ideas that I loved! The pictures convinced me that my room wouldn’t feel smaller with the four-poster bed and that I needed one yesterday ? The retail price for the beds was over $2,000 before shipping. So, I got busy designing my new DIY Canopy Bed idea and had Whitney come over to help me build it! We were able to build it for about $375 in framing lumber that we found at our local hardware store!
Come build it with us! Just click play in the box below!
Pretty simple right?!
Follow along in the step-by-step guide below.
Table of Contents
Cut the boards for the legs, end rails and side rails. Drill 1 1/2″ pocket holes at the ends of 2 of the side rails and 2 of the end rails.
Attach 2 leg pieces together, 2 side rail pieces together and 2 end rail pieces together with wood glue and secure with clamps. Let them dry completely before unclamping. Build 4 leg assemblies, 2 side rail assemblies and 2 end rail assemblies. Make sure the pocket holes face up and down (exposed on both sides).
Cut the bottom side rail boards and drill 3/4″ pocket holes at both ends and the top edge.
Attach it to the frame with 1 1/4″ pocket hole screws and wood glue. The bottom side rail board should be flush with the inside of the legs and rail.
Attach the top side rail assembly to the top of the side rail and the legs with 2 1/2″ pocket hole screws and wood glue.
Cut the top side rails to size and drill 1 1/2″ pocket holes at both ends. Center them on the legs, 3/4″ down from the top and attach them with 2 1/2″ pocket hole screws and wood glue.
Cut the cleat to size and attach it to the side rail with 2″ wood screws and wood glue. It should be 3/4″ down from the top of the side rail.
Flip the side assembly over. Attach the rail assembly to the legs with 2 1/2″ pocket hole screws. Next, cut the side trim piece to size and attach the trim piece to the front of the side rail with 1 1/4″ brad nails and wood glue.
Cut the headboard and footboard rails to size and drill 3/4″ pocket holes at both ends and one edge of each board. Attach them to the side assemblies with 1 1/4″ pocket hole screws and wood glue.
Attach the end rail assemblies (from step 1) on top of the end rails. Attach them with 2 1/2″ pocket hole screws and wood glue, into the legs. Use 1 1/4″ pocket hole screws and wood glue to attach them to the end rails.
Cut the headboard and footboard trim to size. Attach it over the rails with 1 1/4″ brad nails and wood glue.
If you’re using the barn wood planks, cut the 1/2″ plywood and barn wood planks to size and attach them to the 1/2″ plywood with 3/4″ pin nails and wood glue. Then, skip to the step 3.
Cut the 1×6 boards to size and drill 3/4″ pocket holes according to the diagram. Attach them together with 1 1/4″ pocket hole screws and wood glue.
Cut the headboard cleats to size and attach them to the headboard planks with 1″ brad nails and wood glue, from the cleats into the back of the headboard planks.
Cut the headboard side trim to size and attach it to the ends of the headboard. If you are using 1×6 attach with 1 1/4″ pocket hole screws and wood glue. If you are using barn wood planks, attach the trim with 1″ brad nails and wood glue.
Cut the top and bottom trim pieces to size and attach them the same way.
Attach the headboard to the posts with 2″ wood screws, from the inside of the headboard trim, into the legs.
Cut the headboard and footboard top rails to size. Drill 1 1/2″ pocket holes at both ends and attach them to the legs with 2 1/2″ pocket hole screws.
Cut the middle cleat to size and drill 3/4″ pocket holes at both ends. Center it on the headboard and footboard rail assemblies, 3/4″ down from the top of the rail. Attach it with 1 1/4″ pocket hold screws.
Cut the mattress slats to size, spread them out evenly on the cleats and attach them to the cleats with 1 1/4″ wood screws.
Fill your exposed pocket holes and nails holes and add a finish!
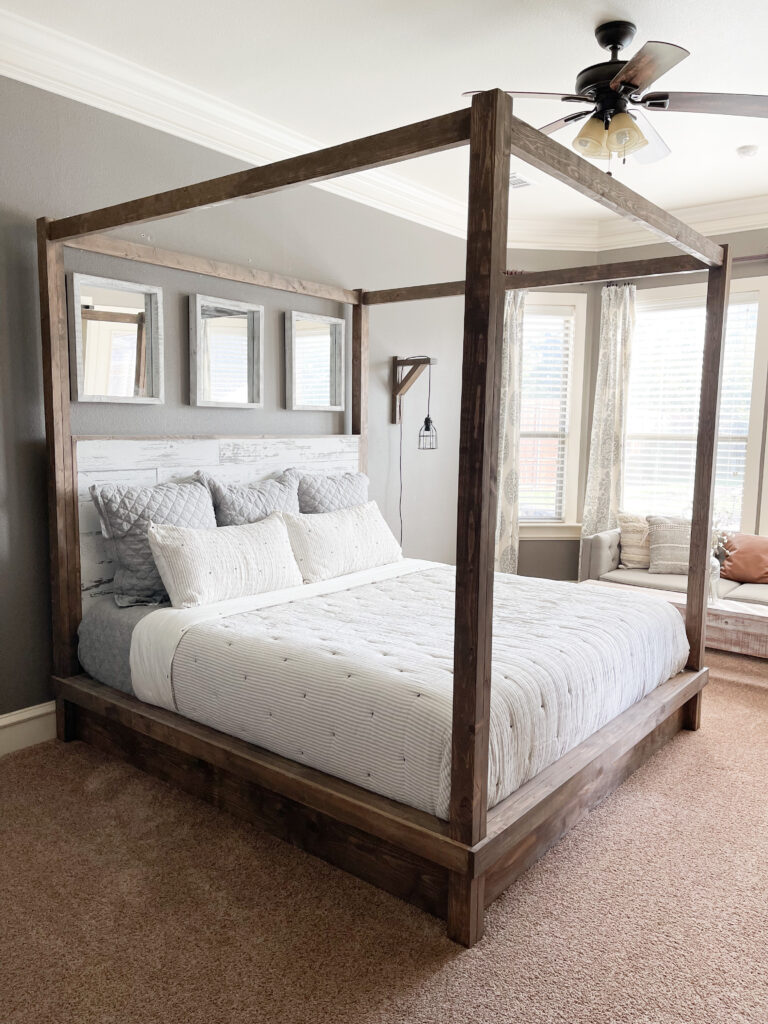
I am so in love with my new DIY Canopy Bed! Beds are the easiest way to completely change the look of a room. I love how it fits in my room and the new look it gives this space! I’m now debating adding string lights ? I’ve seen people hang fabric panels or sheer fabric panels on the canopy but I prefer the open look for my space.
Have fun with it and make it your own. Make sure to share your builds with us on Instagram, Facebook and Pinterest and use #shanty2chic so we can share them too!
Happy Building!
This set of plans is for a king sized mattress but it’s a very simple to modify these plans to fit any mattress size. I’m listing the standard mattress sizes below.
Just subtract the width of your bed and the length of your bed from the original king dimensions.
The only boards that will change on the width will be the headboard, footboard and mattress slats. The only boards that will change for the length of your mattress will be the side frame pieces.
I am so excited about my new DIY Canopy Bed! I’ve always loved the vibe a four-poster bed gives a room but I’ve never owned one because I was afraid it would make my room look smaller with the bed posts running up towards the ceiling.
I’ve been wanting to build a new bed so I was looking online for inspiration when I found a few canopy bed ideas that I loved! The pictures convinced me that my room wouldn’t feel smaller with the four-poster bed and that I needed one yesterday ? The retail price for the beds was over $2,000 before shipping. So, I got busy designing my new DIY Canopy Bed idea and had Whitney come over to help me build it! We were able to build it for about $375 in framing lumber that we found at our local hardware store!
Come build it with us! Just click play in the box below!
Pretty simple right?!
Follow along in the step-by-step guide below.
Table of Contents
Cut the boards for the legs, end rails and side rails. Drill 1 1/2″ pocket holes at the ends of 2 of the side rails and 2 of the end rails.
Attach 2 leg pieces together, 2 side rail pieces together and 2 end rail pieces together with wood glue and secure with clamps. Let them dry completely before unclamping. Build 4 leg assemblies, 2 side rail assemblies and 2 end rail assemblies. Make sure the pocket holes face up and down (exposed on both sides).
Cut the bottom side rail boards and drill 3/4″ pocket holes at both ends and the top edge.
Attach it to the frame with 1 1/4″ pocket hole screws and wood glue. The bottom side rail board should be flush with the inside of the legs and rail.
Attach the top side rail assembly to the top of the side rail and the legs with 2 1/2″ pocket hole screws and wood glue.
Cut the top side rails to size and drill 1 1/2″ pocket holes at both ends. Center them on the legs, 3/4″ down from the top and attach them with 2 1/2″ pocket hole screws and wood glue.
Cut the cleat to size and attach it to the side rail with 2″ wood screws and wood glue. It should be 3/4″ down from the top of the side rail.
Flip the side assembly over. Attach the rail assembly to the legs with 2 1/2″ pocket hole screws. Next, cut the side trim piece to size and attach the trim piece to the front of the side rail with 1 1/4″ brad nails and wood glue.
Cut the headboard and footboard rails to size and drill 3/4″ pocket holes at both ends and one edge of each board. Attach them to the side assemblies with 1 1/4″ pocket hole screws and wood glue.
Attach the end rail assemblies (from step 1) on top of the end rails. Attach them with 2 1/2″ pocket hole screws and wood glue, into the legs. Use 1 1/4″ pocket hole screws and wood glue to attach them to the end rails.
Cut the headboard and footboard trim to size. Attach it over the rails with 1 1/4″ brad nails and wood glue.
If you’re using the barn wood planks, cut the 1/2″ plywood and barn wood planks to size and attach them to the 1/2″ plywood with 3/4″ pin nails and wood glue. Then, skip to the step 3.
Cut the 1×6 boards to size and drill 3/4″ pocket holes according to the diagram. Attach them together with 1 1/4″ pocket hole screws and wood glue.
Cut the headboard cleats to size and attach them to the headboard planks with 1″ brad nails and wood glue, from the cleats into the back of the headboard planks.
Cut the headboard side trim to size and attach it to the ends of the headboard. If you are using 1×6 attach with 1 1/4″ pocket hole screws and wood glue. If you are using barn wood planks, attach the trim with 1″ brad nails and wood glue.
Cut the top and bottom trim pieces to size and attach them the same way.
Attach the headboard to the posts with 2″ wood screws, from the inside of the headboard trim, into the legs.
Cut the headboard and footboard top rails to size. Drill 1 1/2″ pocket holes at both ends and attach them to the legs with 2 1/2″ pocket hole screws.
Cut the middle cleat to size and drill 3/4″ pocket holes at both ends. Center it on the headboard and footboard rail assemblies, 3/4″ down from the top of the rail. Attach it with 1 1/4″ pocket hold screws.
Cut the mattress slats to size, spread them out evenly on the cleats and attach them to the cleats with 1 1/4″ wood screws.
Fill your exposed pocket holes and nails holes and add a finish!
I am so in love with my new DIY Canopy Bed! Beds are the easiest way to completely change the look of a room. I love how it fits in my room and the new look it gives this space! I’m now debating adding string lights ? I’ve seen people hang fabric panels or sheer fabric panels on the canopy but I prefer the open look for my space.
Have fun with it and make it your own. Make sure to share your builds with us on Instagram, Facebook and Pinterest and use #shanty2chic so we can share them too!
Happy Building!
This set of plans is for a king sized mattress but it’s a very simple to modify these plans to fit any mattress size. I’m listing the standard mattress sizes below.
Just subtract the width of your bed and the length of your bed from the original king dimensions.
The only boards that will change on the width will be the headboard, footboard and mattress slats. The only boards that will change for the length of your mattress will be the side frame pieces.
| Created by | Shanty 2 Chic |
| Price | Free |
| Views | 29 |
Member functions
Login or register to rate, favorite and comment on plans