Built-in Storage Bed
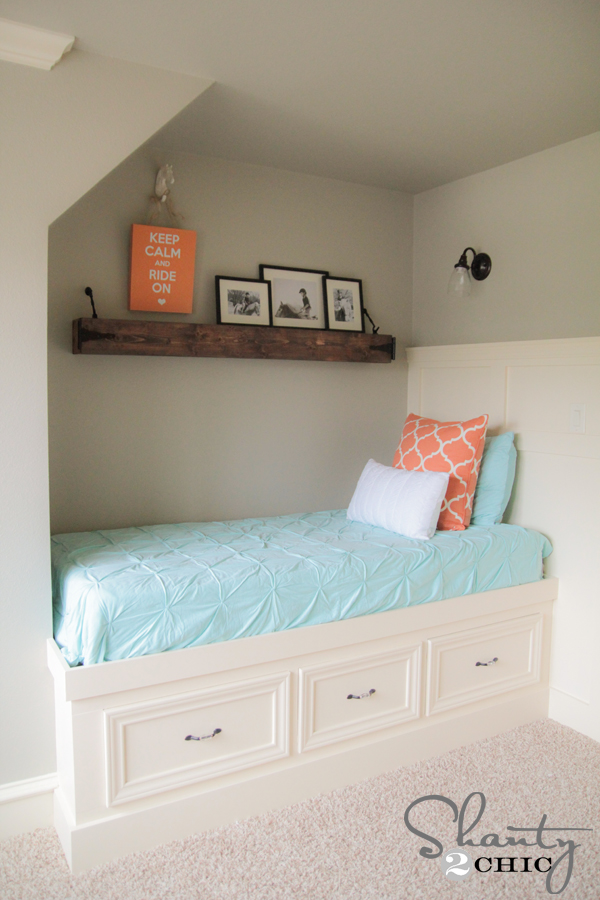
Oh hey guys!! Can I get a TGIF?? I am so, so excited about this project and free plans I am sharing today! Do youfollow us on Instagram??If so, you have seen the progress of this new room in my house! I recentlyclosed off a loft space in our hometo give my daughter her own room. This room has a wall that was begging for a built-in bed, so that’s just what I did! Check out her new built-in twin storage bed!
Ahhhh I am SO in love with her bed. I may trade her ?
So, what’s the best thing about this bed?? We have FREE plans to help you make your own! I know many of you don’t have this exact space for a twin bed like I do, but many of you do have a corner space. With a couple of modifications to the left side of the bed, this would make a perfect corner bed! And the other best part… STORAGE! Giant drawers without mechanical drawer pulls… Yes. I said it! This runs on a very cool wood drawer slide system that is super easy to build and incredibly sturdy.You can download our full set of FREE plans by clicking HERE or the button below.I will walk you through the entire build below as well!
So… Let’s get started!
I used my crazy, awesomeKreg Jigto build this entire thing. Both Ashley and I used theK5 model,which you can seeHERE!We used the K4 for years and recently upgraded to the K5 and WOW… So many little upgrades that save a ton of time and make it even easier to use. If you are clueless about what the heck a Kreg Jig is,check out our video HEREwhere we really try to break it down to help you guys easily understand how it works.
I built the front frame of the bed first. Since the boards I am attaching to are 3/4″ thick, I used 3/4″ pocket holes on this part.
Then, I attached them using 1.25″ pocket hole screws. I did use wood glue between each of my joints.
Same thing for the middle of the frame…
And, a few minutes later (literally) I had a frame!
Next, I moved on to the back frame. This is constructed with 2×3 and 2×4 material. Since the wood I was attaching to is 1.5″ thick, I used 1.5″ pocket holes on these pieces.
Next, I attached them using wood glue and 2.5″ pocket hole screws. I used myRyobi 18V drillfor this part.
Here is the back frame constructed…
At this point, I took these frames into the house in her room. I decided to attach everything else in the room to make it easier to get in the house. Now, it’s time for those drawer slides. These drawers run on a wood drawer slide system. You basically make T’s and L’s using wood glue and 2.5″ wood screws. I clamped my pieces together to attach them. Make sure to pre drill on this part to prevent the wood from splitting. Before attaching them, you will make your pocket holes on each piece. You can see here what the T shape should look like…
Haha! How funny is this picture?? I didn’t even notice it until I started editing photos but it made me LOL. He is not super happy about those pocket holes ? …
Now for the L pieces. I did decide to place my pocket holes a bit different on this part. You can see on the 2×3 where I put them. I just thought it was easier to put them on that side of the board because it easily fit in the jig. Both ways work though!
Next, you will attach your drawer slides to the frames. You can see here that the back frame is attached with 2.5″ pocket hole screws and the front with 1.25″ pocket hole screws.
Once you have all 4 of those attached, it’s time to add the top runners that will support the mattress and keep the drawers from tipping out. I attached these the same way.
At this point, I set the entire bed into place and used 3 1/2″ wood screws to attach to the studs in the wall.
I measured the openings for each drawer and started constructing those.
I used 3/4″ PureBond plywood for all of my drawers. I had the guys at Home Depot cut it down for me to get it home easier. You can see where I added my 3/4″ pocket holes on the drawers.
I attached them using wood glue and 1.25″ pocket hole screws.
I attached the bases using wood screws from the bottom side. Make sure to pre drill on this part too! It will help keep your wood from splitting.
Here they are fit in the spaces before I trimmed them out.
I used a cheap casing to trim mine out. I actually found a pro-pack of 6 sticks of door casing for $13 at Home Depot. Can’t beat that!
I used my Ryobi AirStrike nailer to attach all of my trim.
My last step was adding my side boards on the wall and finishing off the side of the bed.
I did run into a little problem here with my existing baseboards. I didn’t want to rip this whole board out, so I used myRyobi reciprocating sawto even it out. Love this thing! And, it uses the same battery as my drill making it super easy!
My final step before painting it was caulk and putty!
This part covers all my mess-ups and nail holes!
I painted it the same color as my trim color. It’s actually a match to my existing trim color. I love Sherwin-Williams paint, so a while back I had them match my trim color in my house. Although I don’t have the exact color name, here is the label with the color on it. I LOVE this paint. It goes on very thick and hides a lot.
The walls are an AMAZING gray that I love so much! It is called Jogging Path by Sherwin-Williams. My fav part about their paint is that I can call in to order it, and swing by and pick it up. This totally beats standing in line at the hardware store with screaming babies… Not that I have ever had that issue. ?
This is the color… It is much more gray that it appears in this swatch. I LOVE it.
I found all the bedding at Target! And that about covers it! I will be sharing ALL of the other fun projects you see in the pictures over the next couple weeks.
Here are a few more shots!
And the drawers baby…. WOOHOO! They easily slide in and out and I can stand inside of them because they are so sturdy!
Remember, you candownload the full set of FREE plans for this bed HERE! Thanks so much toJay of Jay’s Custom Creationsfor putting all of Shanty2Chic’s original designs into printable plans for our readers! He’s the bomb! Go check out his site!
Thanks so much for stopping by guys! I would LOVE for you to PIN and share this bed with all your friends guys!
Let me know if you have any questions at all!
~Whitney
| Created by | Shanty 2 Chic |
| Price | Free |
| Views | 20 |
Member functions
Login or register to rate, favorite and comment on plans