Cheap And Easy Way To Update A Bathroom!
Hey there! I know there are so many of us that have these boring, builder-grade mirrors hanging in their bathrooms!
Our little sister, Leasha, moved into her new home this year and she decided she wanted to spruce up her bathroom mirrors a bit! This is by far one of the easiest ways to fancy-up your boring mirrors and the best part about this project is that it won’t damage your mirror and it’s not permanent so you can change them in and out as your taste changes. This is also perfect for those who are renting!
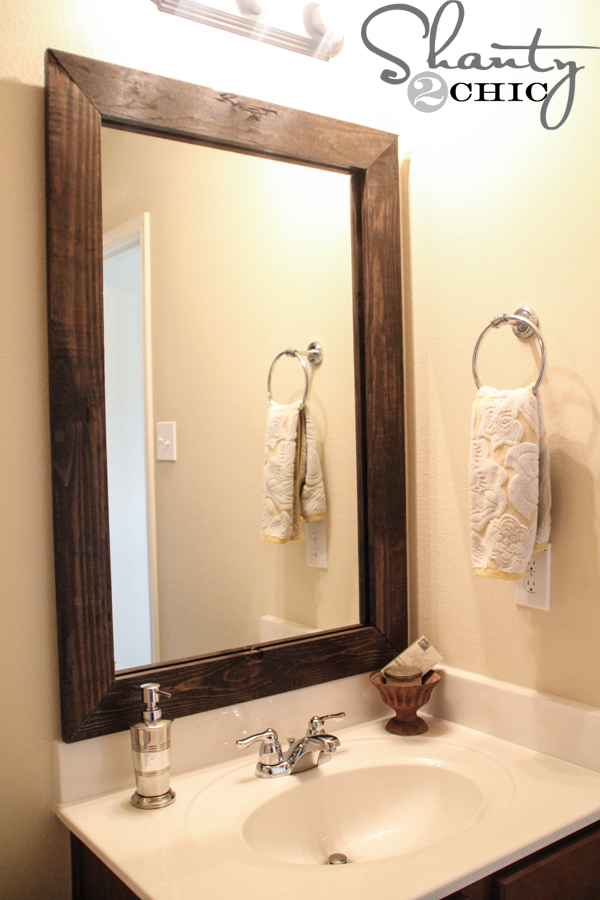
Here is the after – after about 45 minutes of work and about $15 ?
Can you believe the difference! Here’s how we did it!
Leasha’s mirror was 42″x28″. We added an inch to each side so our frame would be 43″x29″. (We purchased 2 1×4 pine boards for this mirror. Pine is the most affordable route). These measurements will be long point to long point. You can use a handsaw and miter box or a miter saw to make these cuts.
I used my miter saw. You will make a 45 degree cut on one side, mark the measurement, swing the arm to the opposite side and make another 45 degree cut! EASY ?
I used my Kreg Jig to make pocket holes in the short boards. Just place the board in with the angle flush against the base of the Jig. I drilled 2 holes on each end.
We want these frames to look very smooth and clean because they are going to be mirror frames. I used pine boards to save money but we need to use a little elbow grease to clean them up before we stain them!
I started by using a 3M Sandblaster sanding pad to sand all of the edges and the top of the boards. 3M has a great line of3M Advanced Abrasivesto choose from!
I started by using a 3M Sandblaster sanding pad to sand all of the edges and the top of the boards. These are great because they are flexible and they last a long time!I always use3M TEKK Protectionwhen I work!
Now, go back and fill any gouges and scratches that your boards have with3M Wood Filler. If you are staining, make sure to get the stainable wood filler!
Now for the finish! I stained the boards with Rust-Oleum Dark Walnut stain and attached them with 1-1/4″ pocket hole screws.
Now for the big SECRET!
We are going to hang this beauty with 3M Command Strips! They are perfect for this project because they will not leave a residue on the mirror when you take it down!
***I removed all of her mirror clips so that the frame fit. Leasha’s mirrors are very secure but if you are concerned about removing yours, you can buy very thin plastic mirror clips at your local hardware store to replace them. The frame will fit over the thinner style clips:)***
That was IT! This project just makes me giddy! You just get so much bang for your buck and it really does change the entire look of the bathroom! What’s even better is that when you decide to revamp your bathroom again, you can just pop it off, pull the 3M Command Strips off and make another!
Thanks so much for stopping by! If you love this project, we would LOVE your pins ?
~ Ashley
This post is a collaboration with 3M DIY. To keep up-to-date on projects, products and sampling visit 3MDIY.com and be sure to follow all of their social media sites!
3M DIY Facebook Page
3M DIY Twitter Page
3M DIY YouTube Page
Our little sister, Leasha, moved into her new home this year and she decided she wanted to spruce up her bathroom mirrors a bit! This is by far one of the easiest ways to fancy-up your boring mirrors and the best part about this project is that it won’t damage your mirror and it’s not permanent so you can change them in and out as your taste changes. This is also perfect for those who are renting!
Here is the after – after about 45 minutes of work and about $15 ?
Can you believe the difference! Here’s how we did it!
Leasha’s mirror was 42″x28″. We added an inch to each side so our frame would be 43″x29″. (We purchased 2 1×4 pine boards for this mirror. Pine is the most affordable route). These measurements will be long point to long point. You can use a handsaw and miter box or a miter saw to make these cuts.
I used my miter saw. You will make a 45 degree cut on one side, mark the measurement, swing the arm to the opposite side and make another 45 degree cut! EASY ?
I used my Kreg Jig to make pocket holes in the short boards. Just place the board in with the angle flush against the base of the Jig. I drilled 2 holes on each end.
We want these frames to look very smooth and clean because they are going to be mirror frames. I used pine boards to save money but we need to use a little elbow grease to clean them up before we stain them!
I started by using a 3M Sandblaster sanding pad to sand all of the edges and the top of the boards. 3M has a great line of3M Advanced Abrasivesto choose from!
I started by using a 3M Sandblaster sanding pad to sand all of the edges and the top of the boards. These are great because they are flexible and they last a long time!I always use3M TEKK Protectionwhen I work!
Now, go back and fill any gouges and scratches that your boards have with3M Wood Filler. If you are staining, make sure to get the stainable wood filler!
Now for the finish! I stained the boards with Rust-Oleum Dark Walnut stain and attached them with 1-1/4″ pocket hole screws.
Now for the big SECRET!
We are going to hang this beauty with 3M Command Strips! They are perfect for this project because they will not leave a residue on the mirror when you take it down!
***I removed all of her mirror clips so that the frame fit. Leasha’s mirrors are very secure but if you are concerned about removing yours, you can buy very thin plastic mirror clips at your local hardware store to replace them. The frame will fit over the thinner style clips:)***
That was IT! This project just makes me giddy! You just get so much bang for your buck and it really does change the entire look of the bathroom! What’s even better is that when you decide to revamp your bathroom again, you can just pop it off, pull the 3M Command Strips off and make another!
Thanks so much for stopping by! If you love this project, we would LOVE your pins ?
~ Ashley
This post is a collaboration with 3M DIY. To keep up-to-date on projects, products and sampling visit 3MDIY.com and be sure to follow all of their social media sites!
3M DIY Facebook Page
3M DIY Twitter Page
3M DIY YouTube Page
| Created by | Shanty 2 Chic |
| Price | Free |
| Views | 18 |
Member functions
Login or register to rate, favorite and comment on plans