Reclaimed Wood Nightstands
Hey everyone! I have to show you what I’ve been working on!
Love! I found theReclaimed Wood Nightstandplans over atAna’s! They are a perfect match for my son’sReclaimed Wood Headboardthat I built him!
I used theKreg Jigfor this build and it made things so much easier! Kreg is my new BFF!
TheKreg Jigis a pocket hole system that eliminates the need for 15 hands while you predrill ?
and it drives the screws in at an angle making joints stronger! I followedAna’sdirections for building the night stands with the Kreg Jig and it was so much easier than the predrilling I have done in the past!
Here are some pics of the building stages:)
Frames for the drawers
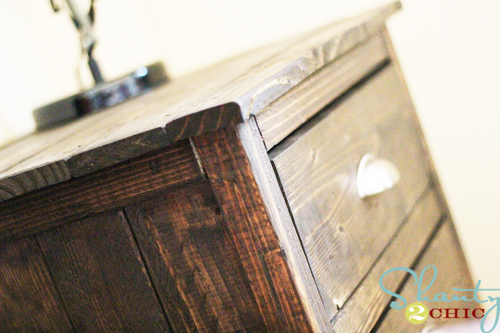
Ready for finish! I used 1 coat of Minwax Dark Walnut stain and followed with Minwax Polycrylic.
For the final touch, I found these great pulls at Home Depot. They weren’t cheap ($4.49 each) but I didn’t want to skimp on the hardware because these were the “perfect” touch;-)
I’m so glad I went with the hardware that I really wanted! I love the way these turned out!
Where did I get that super cute lamp? Oh… Wal-Mart for $9 (shhhhh)! My son found some similar in the PBTeen catalog but that’s not in the budget (especially when I need 2;-) I tried my luck at Wal-Mart and we are both happy!
Okay, here’s the run-down on cost:
$40 for lumber
$30 for hardware
I had the stain so that was free:) $35 per night stand ~ I’ll take it!
***Stop by later and check out our 2nd video tutorial!***
Happy Monday to you all!
~Ashley
Love! I found theReclaimed Wood Nightstandplans over atAna’s! They are a perfect match for my son’sReclaimed Wood Headboardthat I built him!
I used theKreg Jigfor this build and it made things so much easier! Kreg is my new BFF!
TheKreg Jigis a pocket hole system that eliminates the need for 15 hands while you predrill ?
and it drives the screws in at an angle making joints stronger! I followedAna’sdirections for building the night stands with the Kreg Jig and it was so much easier than the predrilling I have done in the past!
Here are some pics of the building stages:)
Frames for the drawers
Ready for finish! I used 1 coat of Minwax Dark Walnut stain and followed with Minwax Polycrylic.
For the final touch, I found these great pulls at Home Depot. They weren’t cheap ($4.49 each) but I didn’t want to skimp on the hardware because these were the “perfect” touch;-)
I’m so glad I went with the hardware that I really wanted! I love the way these turned out!
Where did I get that super cute lamp? Oh… Wal-Mart for $9 (shhhhh)! My son found some similar in the PBTeen catalog but that’s not in the budget (especially when I need 2;-) I tried my luck at Wal-Mart and we are both happy!
Okay, here’s the run-down on cost:
$40 for lumber
$30 for hardware
I had the stain so that was free:) $35 per night stand ~ I’ll take it!
***Stop by later and check out our 2nd video tutorial!***
Happy Monday to you all!
~Ashley
| Created by | Shanty 2 Chic |
| Price | Free |
| Views | 9 |
Member functions
Login or register to rate, favorite and comment on plans