Ledge With Hooks!
Hey guys!
I killed 2 birds with one stone on this next project. My son has a big blank space above his dresser that has been staring at me for the last several months… Ok for like the last year.
I also find myself picking up his baseball hats all day long stacking them in his closet. So… I found a fun way to fill that space and take care of my hat problem ?
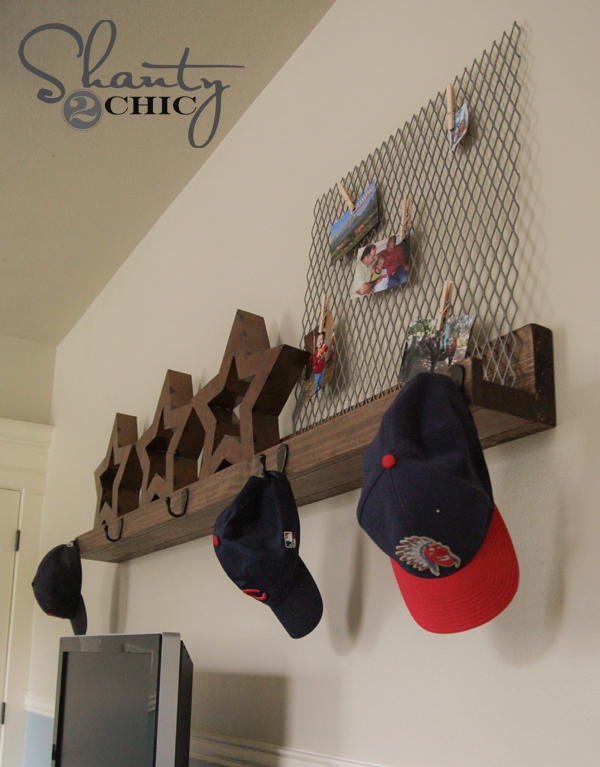
Here is how it turned out!
This is very similar to thepicture ledges I did on his other wall, but I really wanted to beef this one up. Here is the wood I used for the shelf…That’s around $12 in wood for this shelf. You can see above where I used myKreg Jigto add some pocket holes on my 2×4. I did 7 1.5″ pocket holes on one side of the 2×4.To attach my 2×4 and 2×6, I used 2.5″ pocket holes screws through my pocket holes and attached them like this…Next, I attached my 1×3 that serves as the lip of the shelf. I first added a line of Gorilla Wood glue like this.Next, I used myRyobi AirStrike Cordless nail gunto attach the 1×3 like this…For those of you that still don’t have this nail gun… Add it to the Christmas list! You will thank us! It’s too legit to quit. Super easy and powerful and totally awesome all at once.That’s it for assembly! Doesn’t really get much easier than that!I stained this shelf the same color as his bed, nightstands and other pieces. They are all Rust-Oleum Ultimate Wood Stain in Dark Walnut. I let that dry and hung it up.To attach mine to the wall, I decided the best method would be to use wood screws through the 2×6 back and into the studs of the wall. Before hanging it, I used astud finderto find the studs in my wall. This is another great tool to have handy. You will probably be surprised how much you end up using it! I used 3.5″ screws for this part.I had my dad hold the ledge in place while I put the wood screws into place.Excuse my grainy photos! We actually had rain today and this is as good as it gets ?After getting the shelf hung up, I added the hooks. I found these great hooks at Home Depot. They are actually called robe hooks.You can also find them super cheap on Amazon here…I measured off each one and drilled a small hole where each screw would be…My last step was attaching them with the hooks! I used my Ryobi 18V drill for this also!And here it is all done and pretty! I mean ‘cool’…What do you think??I hope you love it as much as he does ? I would love for you to share my shelf and PIN if below too! Thanks so much for stopping by! Let me know if you have any questions at all ?~Whitney10.7KsharesFacebookTwitterPinterest
This is very similar to thepicture ledges I did on his other wall, but I really wanted to beef this one up. Here is the wood I used for the shelf…
That’s around $12 in wood for this shelf. You can see above where I used myKreg Jigto add some pocket holes on my 2×4. I did 7 1.5″ pocket holes on one side of the 2×4.
To attach my 2×4 and 2×6, I used 2.5″ pocket holes screws through my pocket holes and attached them like this…
Next, I attached my 1×3 that serves as the lip of the shelf. I first added a line of Gorilla Wood glue like this.
Next, I used myRyobi AirStrike Cordless nail gunto attach the 1×3 like this…
For those of you that still don’t have this nail gun… Add it to the Christmas list! You will thank us! It’s too legit to quit. Super easy and powerful and totally awesome all at once.
That’s it for assembly! Doesn’t really get much easier than that!
I stained this shelf the same color as his bed, nightstands and other pieces. They are all Rust-Oleum Ultimate Wood Stain in Dark Walnut. I let that dry and hung it up.
To attach mine to the wall, I decided the best method would be to use wood screws through the 2×6 back and into the studs of the wall. Before hanging it, I used astud finderto find the studs in my wall. This is another great tool to have handy. You will probably be surprised how much you end up using it! I used 3.5″ screws for this part.
I had my dad hold the ledge in place while I put the wood screws into place.
Excuse my grainy photos! We actually had rain today and this is as good as it gets ?
After getting the shelf hung up, I added the hooks. I found these great hooks at Home Depot. They are actually called robe hooks.
You can also find them super cheap on Amazon here…
I measured off each one and drilled a small hole where each screw would be…
My last step was attaching them with the hooks! I used my Ryobi 18V drill for this also!
And here it is all done and pretty! I mean ‘cool’…
What do you think??
I hope you love it as much as he does ? I would love for you to share my shelf and PIN if below too! Thanks so much for stopping by! Let me know if you have any questions at all ?
~Whitney
I killed 2 birds with one stone on this next project. My son has a big blank space above his dresser that has been staring at me for the last several months… Ok for like the last year.
I also find myself picking up his baseball hats all day long stacking them in his closet. So… I found a fun way to fill that space and take care of my hat problem ?
Here is how it turned out!
This is very similar to thepicture ledges I did on his other wall, but I really wanted to beef this one up. Here is the wood I used for the shelf…That’s around $12 in wood for this shelf. You can see above where I used myKreg Jigto add some pocket holes on my 2×4. I did 7 1.5″ pocket holes on one side of the 2×4.To attach my 2×4 and 2×6, I used 2.5″ pocket holes screws through my pocket holes and attached them like this…Next, I attached my 1×3 that serves as the lip of the shelf. I first added a line of Gorilla Wood glue like this.Next, I used myRyobi AirStrike Cordless nail gunto attach the 1×3 like this…For those of you that still don’t have this nail gun… Add it to the Christmas list! You will thank us! It’s too legit to quit. Super easy and powerful and totally awesome all at once.That’s it for assembly! Doesn’t really get much easier than that!I stained this shelf the same color as his bed, nightstands and other pieces. They are all Rust-Oleum Ultimate Wood Stain in Dark Walnut. I let that dry and hung it up.To attach mine to the wall, I decided the best method would be to use wood screws through the 2×6 back and into the studs of the wall. Before hanging it, I used astud finderto find the studs in my wall. This is another great tool to have handy. You will probably be surprised how much you end up using it! I used 3.5″ screws for this part.I had my dad hold the ledge in place while I put the wood screws into place.Excuse my grainy photos! We actually had rain today and this is as good as it gets ?After getting the shelf hung up, I added the hooks. I found these great hooks at Home Depot. They are actually called robe hooks.You can also find them super cheap on Amazon here…I measured off each one and drilled a small hole where each screw would be…My last step was attaching them with the hooks! I used my Ryobi 18V drill for this also!And here it is all done and pretty! I mean ‘cool’…What do you think??I hope you love it as much as he does ? I would love for you to share my shelf and PIN if below too! Thanks so much for stopping by! Let me know if you have any questions at all ?~Whitney10.7KsharesFacebookTwitterPinterest
This is very similar to thepicture ledges I did on his other wall, but I really wanted to beef this one up. Here is the wood I used for the shelf…
That’s around $12 in wood for this shelf. You can see above where I used myKreg Jigto add some pocket holes on my 2×4. I did 7 1.5″ pocket holes on one side of the 2×4.
To attach my 2×4 and 2×6, I used 2.5″ pocket holes screws through my pocket holes and attached them like this…
Next, I attached my 1×3 that serves as the lip of the shelf. I first added a line of Gorilla Wood glue like this.
Next, I used myRyobi AirStrike Cordless nail gunto attach the 1×3 like this…
For those of you that still don’t have this nail gun… Add it to the Christmas list! You will thank us! It’s too legit to quit. Super easy and powerful and totally awesome all at once.
That’s it for assembly! Doesn’t really get much easier than that!
I stained this shelf the same color as his bed, nightstands and other pieces. They are all Rust-Oleum Ultimate Wood Stain in Dark Walnut. I let that dry and hung it up.
To attach mine to the wall, I decided the best method would be to use wood screws through the 2×6 back and into the studs of the wall. Before hanging it, I used astud finderto find the studs in my wall. This is another great tool to have handy. You will probably be surprised how much you end up using it! I used 3.5″ screws for this part.
I had my dad hold the ledge in place while I put the wood screws into place.
Excuse my grainy photos! We actually had rain today and this is as good as it gets ?
After getting the shelf hung up, I added the hooks. I found these great hooks at Home Depot. They are actually called robe hooks.
You can also find them super cheap on Amazon here…
I measured off each one and drilled a small hole where each screw would be…
My last step was attaching them with the hooks! I used my Ryobi 18V drill for this also!
And here it is all done and pretty! I mean ‘cool’…
What do you think??
I hope you love it as much as he does ? I would love for you to share my shelf and PIN if below too! Thanks so much for stopping by! Let me know if you have any questions at all ?
~Whitney
| Created by | Shanty 2 Chic |
| Price | Free |
| Views | 21 |
Member functions
Login or register to rate, favorite and comment on plans