Workbench
Hey guys! I am so excited about the workbench I built for the shop in mynew house! My shop is still a work-in-progress but this was a huge improvement and much needed addition!
I modified the workbench that Whitney built because I wanted more free space in my shop! You can see her workbenchHERE! This is the perfect bench for small work spaces and I only spent about $100 including the casters.
This is a really quick and easy workbench and of course, we’ve got the Free Printable plans too! You can clickHEREor the image below to print them!
And as always, I’m sharing my step-by-step instructions to help!
I had my MDF boards ripped down at Home Depot and I started by making my cuts and drilling pocket holes, with myKreg Jig, in the legs.
Here is a pic of the assembled legs.
Next the frames! They will both look like this but they are different sizes.
Next, I attached the legs to the frame
Then I added the foot pads.
To attach the bottom frame, I used 2 1/2″ wood screws from the inside of the frame into the legs.
Almost done! Add your casters here before it gets too heavy! (make sure to purchase locking casters)
I used my brad nailer and wood glue to attach the bottom shelf
Then I attached the top the same way!
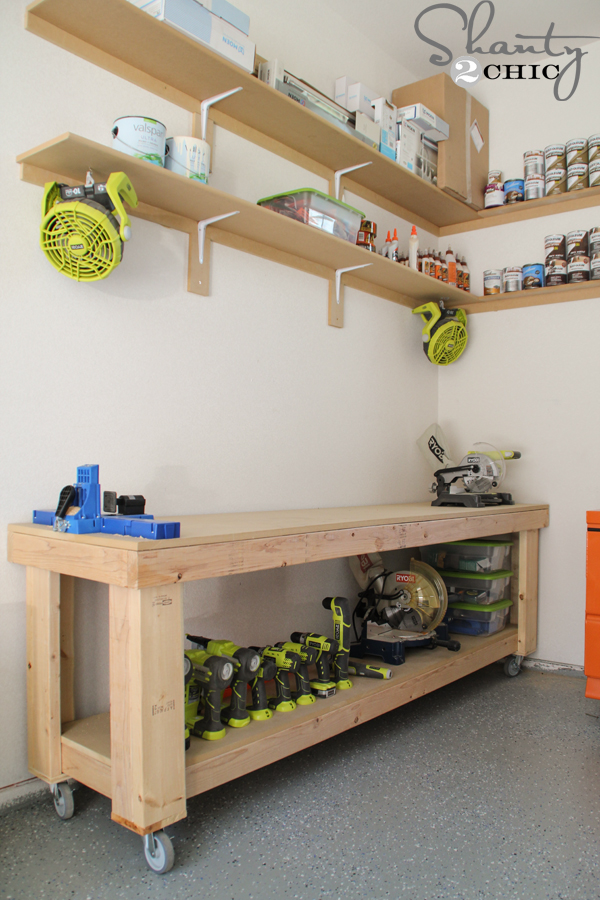
How easy was that?! I love rolling it out of my shop on pretty days (and to watch the kiddos play while I work) As you can see, I have outfitted it with all of our favorite Ryobi power tools and mounted myK5 Kreg Jigto the top ?
My shop is the size of a standard one-car garage and you can see that it still gives me plenty of space to work in my shop!
I love it!! Now I need to get back to building more furniture for the house ?
Thanks so much for stopping by!
~Ashley
I modified the workbench that Whitney built because I wanted more free space in my shop! You can see her workbenchHERE! This is the perfect bench for small work spaces and I only spent about $100 including the casters.
This is a really quick and easy workbench and of course, we’ve got the Free Printable plans too! You can clickHEREor the image below to print them!
And as always, I’m sharing my step-by-step instructions to help!
I had my MDF boards ripped down at Home Depot and I started by making my cuts and drilling pocket holes, with myKreg Jig, in the legs.
Here is a pic of the assembled legs.
Next the frames! They will both look like this but they are different sizes.
Next, I attached the legs to the frame
Then I added the foot pads.
To attach the bottom frame, I used 2 1/2″ wood screws from the inside of the frame into the legs.
Almost done! Add your casters here before it gets too heavy! (make sure to purchase locking casters)
I used my brad nailer and wood glue to attach the bottom shelf
Then I attached the top the same way!
How easy was that?! I love rolling it out of my shop on pretty days (and to watch the kiddos play while I work) As you can see, I have outfitted it with all of our favorite Ryobi power tools and mounted myK5 Kreg Jigto the top ?
My shop is the size of a standard one-car garage and you can see that it still gives me plenty of space to work in my shop!
I love it!! Now I need to get back to building more furniture for the house ?
Thanks so much for stopping by!
~Ashley
| Created by | Shanty 2 Chic |
| Price | Free |
| Views | 14 |
Member functions
Login or register to rate, favorite and comment on plans