Floating Rustic Shelf Or Mantle!
Hey guys!
Thanks so much for all of our sweet comments, shares and pins on mydaughter’s built-in daybedI shared last week. You guys are so encouraging, and make our jobs so fun! To keep up with all of our projects, be sure toFOLLOW us on InstagramandPinterest!
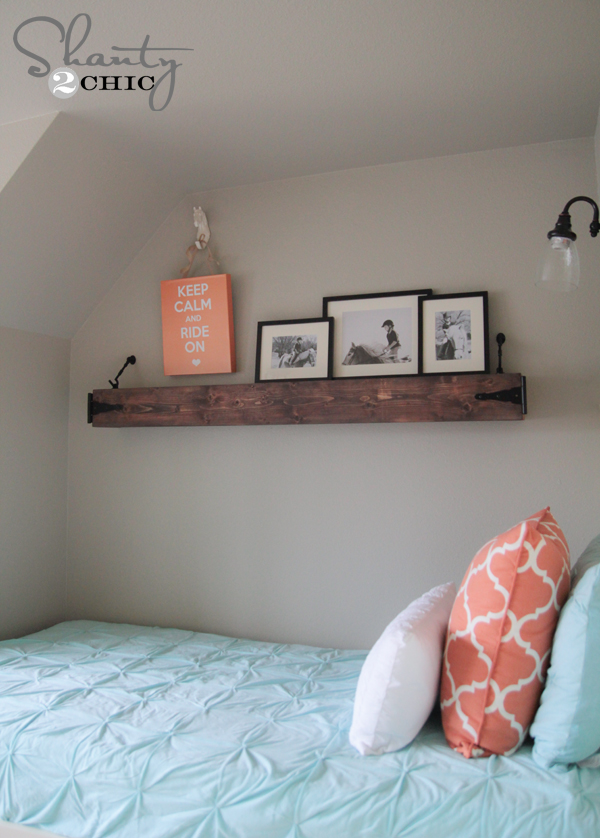
I’ve had a ton of questions on this floating plan I am sharing today! I wanted to add a rustic touch to the space. With all the paint and bright colors, it needed something just like this to warm it up! Here is how it turned out!
This is SUCH an easy build! For those of you that haven’t opened up your Kreg Jig yes, this is a GREAT beginner project! The shelf is 60″ long making it a perfect mantle as well! I also think floating shelves are perfect for renters. Really you only leave a few screw holes in the wall that are very easy to fill and paint back over.
The best part?? We have FREE PLANS for you guys! Thanks so much to our good friendJay of Jay’s Custom Creationsfor putting all of Shanty2Chic’s original ideas into printable plans for our readers! He is the bomb… Go check his site out! He has lots of fun plans as well! To download or print the free plans for this shelf,you can click HERE or the button below!
My first step was making my cuts! The brace of the shelf is made with your 2×4 board. I cut my long board at 58″ and made 4 short pieces that were each 4″ long.
My next step was adding my pocket holes. I used my Kreg Jig for this part. Do you own one?? You need to. Not sure what the heck it is?Check out our video herewhere we really try to break it down and explain what it does and how much it can help you with your projects!
Because the wood I am attaching these brackets to is 1.5″ thick, I added 1.5″ pocket holes to each of my 4″ pieces.
Now to attach these… I tried a new glue I found for this project. It’s called Elmer’s ProBond, and claims to glue just about anything. I loved it on this project. It has the consistency of a wood glue, but sticks to a variety of materials like an epoxy does. And, it doesn’t stink. Win for me!
I used a little under each bracket and then attached them using 2.5″ pocket hole screws with my Ryobi drill.
Many of you ask about our drills. This is BY FAR my favorite drill I have used yet. It is lightweight, cordless, and the battery fits all of my other cordless tools. It even has a fun little magnet tray to hold my extra screws… It’s all in the details… ?
I evenly spaced all 4 brackets, and at this point my shelf brace looked like this…
Now we are ready to build the box! We are basically building an upside down planter box to fit over this brace we just made. I use the 1×6 for this part. I have my top and bottom pieces, which are each 58.5″ long and my side pieces which are both 5.5″ long that we will start with.
I used my Ryobi Cordless AirStrike brad nailer to assemble this part. I just ran a line of glue under each seam and attached them with some 1.25″ brad nails.The last step is attaching the top board. This one is 60″ and I attached it using glue and brad nails.Time for stain! I used three different stains on this part. I started with one coat of Varathane American Walnut. You can find this at Home Depot. Once that dried, I used my Corner Cat sander to distress the edges.My final step was to take a rag and apply two more stains over the whole thing… Varathane Weathered Gray and Kona. I think this gave it an uneven and rustic look and I love it!While that was drying, I attached the shelf brace to the wall. I located the studs in the wall, and marked on my shelf where they would line up. I use a stud finder for this part. I also use a level to make sure my shelf sits straight. I used my drill with a small drill bit to pre-drill two holes where each stud lined up.Next, I used my Ryobi 18V Impact Driver to attach the shelf with 3″ torx screws.And it looked like this!Before attaching the box to the shelf, I added the front hardware to the box. This part makes the shelf in my opinion! I found the cutest hardware in the garage hardware section at Home Depot. The front pieces came in a package like this…To attach the box, I fit it over the frame on the wall and attached it with 2″ wood screws through the top of the box and into the brace. I pre-drilled on this part too to keep my wood from splitting.And the hardware that makes the shelf look suspended are actually decorative locks. This is the package they came in.These don’t support the weight of the shelf… They are just cute! I think they give it such a cool, custom look.That’s it! Here are a few more shots of this bad boy!How fun is that guys? I think this would make such a cool mantle too!Remember you candownload the FREE set of plans by clicking HERE!I would LOVE for you to PIN and share my shelf below! You guys are awesome! Let me know if you have any questions at all!~Whitney33.1KsharesFacebookTwitterPinterest
I used my Ryobi Cordless AirStrike brad nailer to assemble this part. I just ran a line of glue under each seam and attached them with some 1.25″ brad nails.
The last step is attaching the top board. This one is 60″ and I attached it using glue and brad nails.
Time for stain! I used three different stains on this part. I started with one coat of Varathane American Walnut. You can find this at Home Depot. Once that dried, I used my Corner Cat sander to distress the edges.
My final step was to take a rag and apply two more stains over the whole thing… Varathane Weathered Gray and Kona. I think this gave it an uneven and rustic look and I love it!
While that was drying, I attached the shelf brace to the wall. I located the studs in the wall, and marked on my shelf where they would line up. I use a stud finder for this part. I also use a level to make sure my shelf sits straight. I used my drill with a small drill bit to pre-drill two holes where each stud lined up.
Next, I used my Ryobi 18V Impact Driver to attach the shelf with 3″ torx screws.
And it looked like this!
Before attaching the box to the shelf, I added the front hardware to the box. This part makes the shelf in my opinion! I found the cutest hardware in the garage hardware section at Home Depot. The front pieces came in a package like this…
To attach the box, I fit it over the frame on the wall and attached it with 2″ wood screws through the top of the box and into the brace. I pre-drilled on this part too to keep my wood from splitting.
And the hardware that makes the shelf look suspended are actually decorative locks. This is the package they came in.
These don’t support the weight of the shelf… They are just cute! I think they give it such a cool, custom look.
That’s it! Here are a few more shots of this bad boy!
How fun is that guys? I think this would make such a cool mantle too!Remember you candownload the FREE set of plans by clicking HERE!I would LOVE for you to PIN and share my shelf below! You guys are awesome! Let me know if you have any questions at all!~Whitney33.1KsharesFacebookTwitterPinterest
How fun is that guys? I think this would make such a cool mantle too!
Remember you candownload the FREE set of plans by clicking HERE!
I would LOVE for you to PIN and share my shelf below! You guys are awesome! Let me know if you have any questions at all!
~Whitney
33.1KsharesFacebookTwitterPinterest
Thanks so much for all of our sweet comments, shares and pins on mydaughter’s built-in daybedI shared last week. You guys are so encouraging, and make our jobs so fun! To keep up with all of our projects, be sure toFOLLOW us on InstagramandPinterest!
I’ve had a ton of questions on this floating plan I am sharing today! I wanted to add a rustic touch to the space. With all the paint and bright colors, it needed something just like this to warm it up! Here is how it turned out!
This is SUCH an easy build! For those of you that haven’t opened up your Kreg Jig yes, this is a GREAT beginner project! The shelf is 60″ long making it a perfect mantle as well! I also think floating shelves are perfect for renters. Really you only leave a few screw holes in the wall that are very easy to fill and paint back over.
The best part?? We have FREE PLANS for you guys! Thanks so much to our good friendJay of Jay’s Custom Creationsfor putting all of Shanty2Chic’s original ideas into printable plans for our readers! He is the bomb… Go check his site out! He has lots of fun plans as well! To download or print the free plans for this shelf,you can click HERE or the button below!
My first step was making my cuts! The brace of the shelf is made with your 2×4 board. I cut my long board at 58″ and made 4 short pieces that were each 4″ long.
My next step was adding my pocket holes. I used my Kreg Jig for this part. Do you own one?? You need to. Not sure what the heck it is?Check out our video herewhere we really try to break it down and explain what it does and how much it can help you with your projects!
Because the wood I am attaching these brackets to is 1.5″ thick, I added 1.5″ pocket holes to each of my 4″ pieces.
Now to attach these… I tried a new glue I found for this project. It’s called Elmer’s ProBond, and claims to glue just about anything. I loved it on this project. It has the consistency of a wood glue, but sticks to a variety of materials like an epoxy does. And, it doesn’t stink. Win for me!
I used a little under each bracket and then attached them using 2.5″ pocket hole screws with my Ryobi drill.
Many of you ask about our drills. This is BY FAR my favorite drill I have used yet. It is lightweight, cordless, and the battery fits all of my other cordless tools. It even has a fun little magnet tray to hold my extra screws… It’s all in the details… ?
I evenly spaced all 4 brackets, and at this point my shelf brace looked like this…
Now we are ready to build the box! We are basically building an upside down planter box to fit over this brace we just made. I use the 1×6 for this part. I have my top and bottom pieces, which are each 58.5″ long and my side pieces which are both 5.5″ long that we will start with.
I used my Ryobi Cordless AirStrike brad nailer to assemble this part. I just ran a line of glue under each seam and attached them with some 1.25″ brad nails.The last step is attaching the top board. This one is 60″ and I attached it using glue and brad nails.Time for stain! I used three different stains on this part. I started with one coat of Varathane American Walnut. You can find this at Home Depot. Once that dried, I used my Corner Cat sander to distress the edges.My final step was to take a rag and apply two more stains over the whole thing… Varathane Weathered Gray and Kona. I think this gave it an uneven and rustic look and I love it!While that was drying, I attached the shelf brace to the wall. I located the studs in the wall, and marked on my shelf where they would line up. I use a stud finder for this part. I also use a level to make sure my shelf sits straight. I used my drill with a small drill bit to pre-drill two holes where each stud lined up.Next, I used my Ryobi 18V Impact Driver to attach the shelf with 3″ torx screws.And it looked like this!Before attaching the box to the shelf, I added the front hardware to the box. This part makes the shelf in my opinion! I found the cutest hardware in the garage hardware section at Home Depot. The front pieces came in a package like this…To attach the box, I fit it over the frame on the wall and attached it with 2″ wood screws through the top of the box and into the brace. I pre-drilled on this part too to keep my wood from splitting.And the hardware that makes the shelf look suspended are actually decorative locks. This is the package they came in.These don’t support the weight of the shelf… They are just cute! I think they give it such a cool, custom look.That’s it! Here are a few more shots of this bad boy!How fun is that guys? I think this would make such a cool mantle too!Remember you candownload the FREE set of plans by clicking HERE!I would LOVE for you to PIN and share my shelf below! You guys are awesome! Let me know if you have any questions at all!~Whitney33.1KsharesFacebookTwitterPinterest
I used my Ryobi Cordless AirStrike brad nailer to assemble this part. I just ran a line of glue under each seam and attached them with some 1.25″ brad nails.
The last step is attaching the top board. This one is 60″ and I attached it using glue and brad nails.
Time for stain! I used three different stains on this part. I started with one coat of Varathane American Walnut. You can find this at Home Depot. Once that dried, I used my Corner Cat sander to distress the edges.
My final step was to take a rag and apply two more stains over the whole thing… Varathane Weathered Gray and Kona. I think this gave it an uneven and rustic look and I love it!
While that was drying, I attached the shelf brace to the wall. I located the studs in the wall, and marked on my shelf where they would line up. I use a stud finder for this part. I also use a level to make sure my shelf sits straight. I used my drill with a small drill bit to pre-drill two holes where each stud lined up.
Next, I used my Ryobi 18V Impact Driver to attach the shelf with 3″ torx screws.
And it looked like this!
Before attaching the box to the shelf, I added the front hardware to the box. This part makes the shelf in my opinion! I found the cutest hardware in the garage hardware section at Home Depot. The front pieces came in a package like this…
To attach the box, I fit it over the frame on the wall and attached it with 2″ wood screws through the top of the box and into the brace. I pre-drilled on this part too to keep my wood from splitting.
And the hardware that makes the shelf look suspended are actually decorative locks. This is the package they came in.
These don’t support the weight of the shelf… They are just cute! I think they give it such a cool, custom look.
That’s it! Here are a few more shots of this bad boy!
How fun is that guys? I think this would make such a cool mantle too!Remember you candownload the FREE set of plans by clicking HERE!I would LOVE for you to PIN and share my shelf below! You guys are awesome! Let me know if you have any questions at all!~Whitney33.1KsharesFacebookTwitterPinterest
How fun is that guys? I think this would make such a cool mantle too!
Remember you candownload the FREE set of plans by clicking HERE!
I would LOVE for you to PIN and share my shelf below! You guys are awesome! Let me know if you have any questions at all!
~Whitney
33.1KsharesFacebookTwitterPinterest
| Created by | Shanty 2 Chic |
| Price | Free |
| Views | 30 |
Member functions
Login or register to rate, favorite and comment on plans