Check Out My $80 Pottery Barn Inspired Console Table!
Oh hey! Happy Monday!
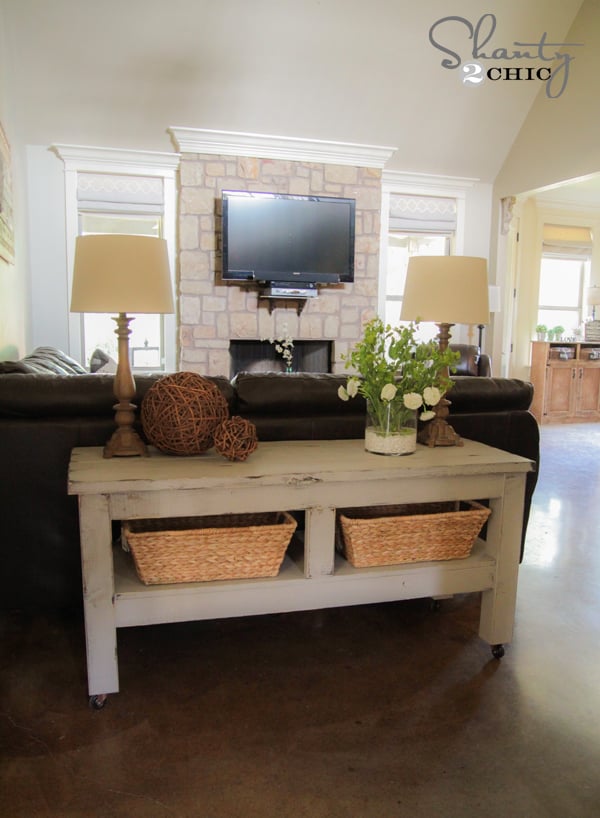
Those of you thatfollow us on Instagramhave seen this bad boy in progress over the last week! I am so excited to finally get to share my Pottery Barn Inspired Console Table!
Isn’t she cute?!
This really was a very simple build… With the right tools!
I teamed up with my sweet friend Ana for this build to bring you guys free plans to build your own. You can see thefull set of free plans HERE!
I will share some building a finishing tips here.
First thing first…
I used my Kreg Jig to build the entire piece. I LOVE myKreg Jig!
If you are thinking ‘What the heck is aKreg Jig?’… You cancheck out our video HEREexplaining it in very simple terms.
I used 1 1/2″ pocket holes and 2 1/2″ pocket hole screws for the entire build. Here are some shots of where I placed my pocket holes…
After the base was done, I moved on to the first shelf. I opted to use a project panel for this part. The price was the same, and I didn’t have to mess with edgebanding the plywood. My panel was from Lowe’s and it was 3/4″ thick and 20″x72″. All I had to do was cut some length off. Easy! After I cut that, I used a pencil to mark where my legs would be like this…
I decided to wait and add the middle braces after this shelf to make it easier. To cut the squares for the legs, I used myRyobi Jig Saw! Love this thing. And best part… It runs on the same battery as my drill and all my other ONE+ tools.
Next I just dropped the shelf into place… I didn’t worry too much about my imperfect cuts. Caulk covers it all! ?
Bigger pic…
I added the top pieces next. Here are a few shots.
One big important tip is adding the pocket holes to your top runners before adding them to the piece. You can see where I have put them along each top board.
You will use these to attach your top to your base. Before doing that, I added my short side pieces. I did run into a small glitch here. My drill wouldn’t fit to insert the screws on the top holes, so I pre drilled and used a 4″ wood screw from the top on each side like you see here in the pic. Make sure to use Gorilla Wood Glue on this part as well!
Now to build the top! I used my Kreg Jig to create the top like this!
After attaching those boards together, I turned the base of the table upside down on top of it like this…
Now you will use the pocket holes you made on the top runners to attach the top planks. Just use 2 1/2″ pocket hole screws through the base and into the top planks. Make sense??
Whew. It was harder to write all that… Promise ?
Want to see how I finished it?
I used one of my favorite finishing techniques for this part. Super simple and cheap!
First, I sprayed the edges and some other areas of my piece with Rust-Oleum Dark Walnut spray paint. It looked like this… I know. Shanty, right?
Next I used Vaseline in small amounts on the edges and corners I wanted to ding up the most. You really don’t need to use a lot at all for this to work. You can see here where I barely rubbed it into the corner.
I share another detailed tutorial on distressing with VaselineHERE.
Once you have that done, you can paint over the whole thing. I used a new Pantone color from Lowe’s called String and I LOVE it. It is a perfect grey. It has just a hint of brown in it making it a nice warm grey without looking cold.
Once that has TOTALLY dried, I use an 80 grit sanding paper to scuff the paint off the corners. Wherever you have put the vaseline, the paint will chip off easily. You can sand more to make is as distressed as you like.
Here is what the finished product looks like…
I did put a coat of Rust-Oleum Ultimate Polyurethane with Soft Touch over the entire thing. This is found at Lowe’s as well. It doesn’t stink and it goes on easily and dries fast.
That’s it!
I added some bronze 2 1/2″ casters from Lowe’s to finish it off!
Here it is…
Thank you SO much for stopping by!Make sure tocheck out the full set of free plans HERE on Ana’s site!
I would LOVE for you to pin this and share it with your peeps below!
You guys are great and have an awesome week!
~Whitney
Click below to purchase a Kreg Jig Master System!Amazon.com Widgets
| Created by | Shanty 2 Chic |
| Price | Free |
| Views | 19 |
Member functions
Login or register to rate, favorite and comment on plans