Table Height Pantry Cabinet
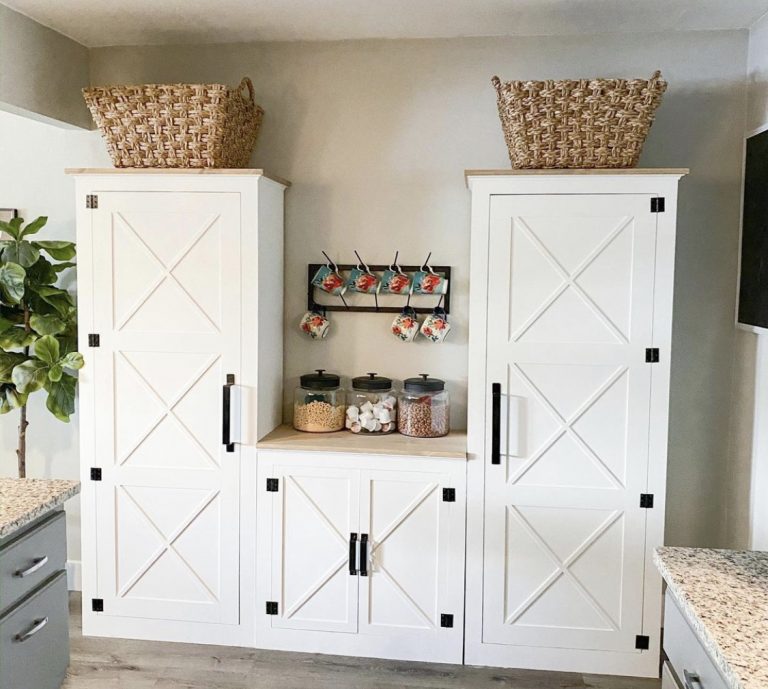
Hey Friends! I know many of you saw theDIY Pantry SystemI built for my sister’s house! This is a great storage system, and I designed it modular so that you can build the pieces to fit your own space and needs. Today I am sharing the middle table height cabinet! This is a perfect addition to the taller cabinets, but makes a perfect stand alone piece too! Before we get started, be sure to check out the YouTube video on this build below!
I love the way this turned out!
First, build the body of the cabinet. This is 3/4” hardwood plywood ripped to 15” wide. You can have the hardware store rip the boards for you to make it easier to get home. Add 3/4” pocket holes on both sides and base as pictured. Attach the base to both sides using a line of wood glue and 1.25” pocket hole screws through your pocket holes. The base will line up 2.75” from the base of the sides to the bottom of the base piece.
I used my Kreg Foreman for this project! It is the beast of pocket hole tools and it’s perfect for a large build like this because it works like a drill press. It will drill pocket holes just like our favorite K5 model but it just makes the process faster.
If you aren’t going to be building a lot of large pieces, won’t be selling your pieces and/or are on a budget, this is the perfect Kreg Jig for you! This is the K5 and it’s perfect for projects big and small!
Now add the middle divider. Add 3/4” pocket holes to the top and bottom of this board and attach it to the center of the bottom board using wood glue and 1.25” pocket hole screws. This board will line up in the center of the base board.
Build the face frame next. The bottom board is a 1×4 and the sides and top board are 1×3. Add 3/4” pocket holes on bpth sides of the top board and to one end of each side board. Attach all pieces to form a rectangle using wood glue and 1.25” pocket hole screws. Make sure all corners and sides are flush.
Before attaching your face frame, attach the shelf boards. I lined mine up 13” from the base, but you can position yours to best fit your storage needs. These boards are also 12” deep like the middle divider. Attach them to the sides and middle divider using wood glue and 1.25” pocket hole screws through the 3/4” pocket holes.
Attach the face frame next. Make sure all sides and base are flush and attach using wood glue and 1.25” pocket hole screws through the 3/4” pocket holes on the cabinet.
Attach the top of the cabinet now. I used a 3/4” thick edge-glued panel for my top. Cut it to size and attach using wood glue and 1.25” pocket hole screws through the 3/4” pocket holes on the inside and top of the cabinet.
Attach the back of the cabinet. I used barnwood planks on mine, but the plans show 1/4” hardwood plywood. You can really use whatever you want on this part. Attach the back using 1” brad nails or staples.
Now it’s time to build the doors to cabinet. The nack of the doors is 1/2” hardwood plywood. Cut them to size.
Add the outside trim next. I am usingTHIS BENDER BOARDfrom HD, but you can also use 1/4”craft boards. This is what the bender board looks like…
These boards are ripped to 1.5“ wide each. Attach the vertical boards first using wood glue and 1/2” brad nails. Then measure and cut the horizontal boards using wood glue and 1/2” brad nails.
Measure and cut the diagonal trim pieces next. These are also bender boards or craft boards that I ripped to 3/4” wide. Attach these boards using wood glue and 3/4” brad nails.
At this point, I painted the doors and cabinet before attaching them. I used Sherwin-Williams Pure White paint in Pure White SW7005. I used a satin finish for this. I also stained the top board before actually attaching it, but you can also tape it off and stain it if it is already attached. I usedTHIS STAINfor the top of the cabinet.
I usedTHESE HINGESfor the cabinet doors.
These are my FAV door pulls! I have used them on so many projects. You can get them onAmazon HEREand they are a great price!
| Created by | Shanty 2 Chic |
| Price | Free |
| Views | 23 |
Member functions
Login or register to rate, favorite and comment on plans