Stenciled Wall Art
Shanty 2 Chic
DIY Stenciled Wall Art – Purdy November
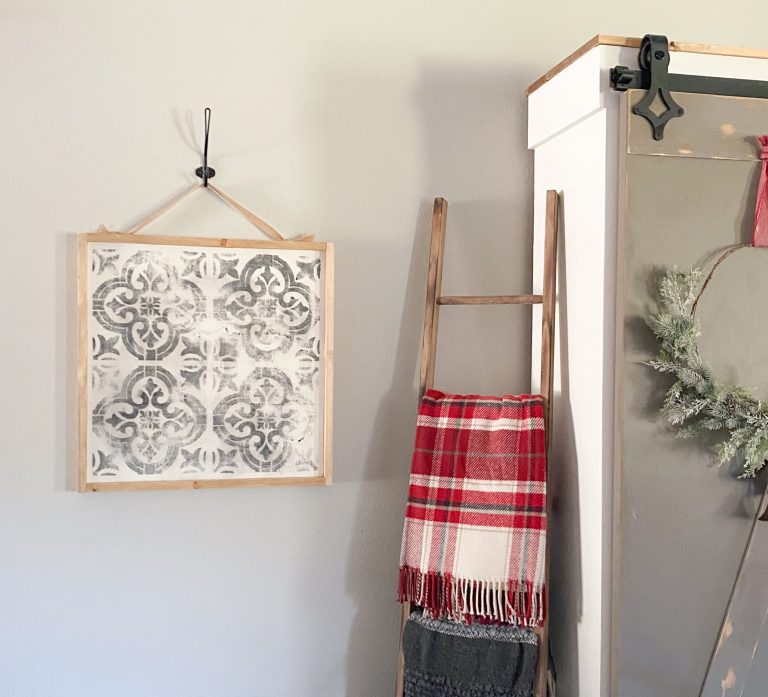
Hey guys! I am so happy with how today’s project turned out! I have a blank space on a wall in my living room that has been in need of something fun. I couldn’t really find what I wanted to put there, so I made it myself! Look how cute this DIY Stenciled Wall Art turned out!
I teamed up withPurdyto create this super cute project! It is so simple to do, and most of you will have most of the supplies sitting at home already.
I started with a scrap piece of ¾” plywood. I used sanded plywood because the outside is much smoother than traditional plywood. I cut my piece to 23” x 23”.
I gave the entire piece a good coat of white chalk paint.
Once that was dry, I placed my stencil in one corner of the plywood and attached it to the board using painter’s tape. I found my stencil super inexpensive HERE on Amazon. It actually comes with 2 stencils making the project even faster.
Now for the fun part! I used my Purdy Jumbo Mini 4” roller with my Purdy 4” Jumbo Mini White Dove roller cover to add the black paint over the stencil. These roller covers leave a smooth, lint-free finish so it’s perfect for this smooth surface.
I just used some inexpensive black acrylic craft paint for this part. The roller cover made this part so quick!
I let the paint dry, and then used 120 grit sandpaper to distress the entire piece. I love the rustic look it gives this piece of art!
The final step was adding my frame! I measured the outside of the plywood and cut some 1×2 boards to size. I stained them before attaching to make it easier! Once the stain was dry, I attached the outside frame using wood glue and 1.25” brad nails through the frame and into the side of the plywood. So easy!
I LOVE how this turned out. It filled the empty space perfectly. It was such a fun and easy project!
To see where to buy your Purdy tools,click here.
This project was sponsored by Purdy Paint Tools, but all opinions and experiences are entirely my own! I love their paint tools! They make each job so much easier and they give a professional finish each time.
DIY Stenciled Wall Art – Purdy November
Hey guys! I am so happy with how today’s project turned out! I have a blank space on a wall in my living room that has been in need of something fun. I couldn’t really find what I wanted to put there, so I made it myself! Look how cute this DIY Stenciled Wall Art turned out!
I teamed up withPurdyto create this super cute project! It is so simple to do, and most of you will have most of the supplies sitting at home already.
I started with a scrap piece of ¾” plywood. I used sanded plywood because the outside is much smoother than traditional plywood. I cut my piece to 23” x 23”.
I gave the entire piece a good coat of white chalk paint.
Once that was dry, I placed my stencil in one corner of the plywood and attached it to the board using painter’s tape. I found my stencil super inexpensive HERE on Amazon. It actually comes with 2 stencils making the project even faster.
Now for the fun part! I used my Purdy Jumbo Mini 4” roller with my Purdy 4” Jumbo Mini White Dove roller cover to add the black paint over the stencil. These roller covers leave a smooth, lint-free finish so it’s perfect for this smooth surface.
I just used some inexpensive black acrylic craft paint for this part. The roller cover made this part so quick!
I let the paint dry, and then used 120 grit sandpaper to distress the entire piece. I love the rustic look it gives this piece of art!
The final step was adding my frame! I measured the outside of the plywood and cut some 1×2 boards to size. I stained them before attaching to make it easier! Once the stain was dry, I attached the outside frame using wood glue and 1.25” brad nails through the frame and into the side of the plywood. So easy!
I LOVE how this turned out. It filled the empty space perfectly. It was such a fun and easy project!
To see where to buy your Purdy tools,click here.
This project was sponsored by Purdy Paint Tools, but all opinions and experiences are entirely my own! I love their paint tools! They make each job so much easier and they give a professional finish each time.
| Created by | Shanty 2 Chic |
| Price | Free |
| Views | 18 |
Member functions
Login or register to rate, favorite and comment on plans