Sliding Barn Door Console
Ok… My love for this next piece is extreme! Look how cute this DIY Sliding Barn Door Console turned out! We partnered with Purdy to show how using high-quality painting tools makes all the difference in your final product. Read on for more!
You can check out theYouTube video tutorial HEREor by clicking the link below!
Before we get started, be sure to download and print theFREE PLANS by clicking HERE!
The first step of this build is to assemble the frame or box. This uses 3/4″ hardwood plywood. I had the guys at the hardware store rip mine to 12″ boards making it easier to get home. Then, I made my cross cuts using my miter saw.
I used my Kreg Jig to make 3/4″ pocket holes on the plywood panels. You can see on the plans where to make all of yours. I attached everything using wood glue and 1.25″ pocket hole screws.
Once you have all of the vertical boards attached, attach the top 1×6 board to the front and top of the box. This will be what hangs the barn door hardware in a later step. Attach this board using wood glue and 1.25″ pocket hole screws.
Now it’s time to attach the bottom trim. Attach the two side pieces first using wood glue and nails, and then attach the long front board also with wood glue and nails.
We are adding the shelves next. These are going to be attached using wood glue and 1.25″ pocket hole screws through the pocket holes on the bottom side of each shelf board.
Next we will add the front trim boards. These are 1×2 that we are attaching with wood glue and finish nails. We like to measure these and cut at this point to get an exact fit. Start with the vertical boards and then measure and cut for the horizontal boards.
Now we are attaching the top board. This is a pine project panel. You can typically find them on the common board aisle at the hardware store. I ripped mine down with my table saw to the correct width, but you can also have the hardware store do that for you. I made the cross cut for the length using my miter saw. Lay this board down with the good side facing the floor and lay the console upside down on top of it. Attach the two using 1.25″ pocket hole screws.
We are building the door next. This is super easy! This is also a pine project panel cut to size, and then we are trimming it using inexpensive pine craft boards. Start with the horizontal boards and then line up the diagonal boards and mark to make a tight fit. Attach these craft boards using wood glue and 5/8″ nails.
And now for the finish… Yeah! This is always the most fun part! It’s amazing how a good coatof paint or stain can change the entire look of a piece. I started by staining the door andconsole top using a Purdy 2.5” Syntox brush, which is a synthetic brush designed specifically forlatex and oil-based stains, paints, varnishes, and clears to provide a smooth, mirror-like andeven finish.
I decided to paint the rest of the console. I used aPurdy NEST 9” Paint Trayand the PurdyRevolution Jumbo Mini Roller Frame with Ultra Finish Roller Covers to make thispart really fast and simple!
To add to the rustic feel, we chose to useHGTV HOME by Sherwin-Williams INFINITY® InteriorComplete One-Coat Paint& Primer in Software (HGSW1463), with a satin finish.
Seriously I LOVE this roller! The microfiber is the bomb and I had the whole cabinet painted in under 30 minutes! It picked up and distributed paint so evenly, I never had to worry about paint dripping, or the roller dragging or catching.
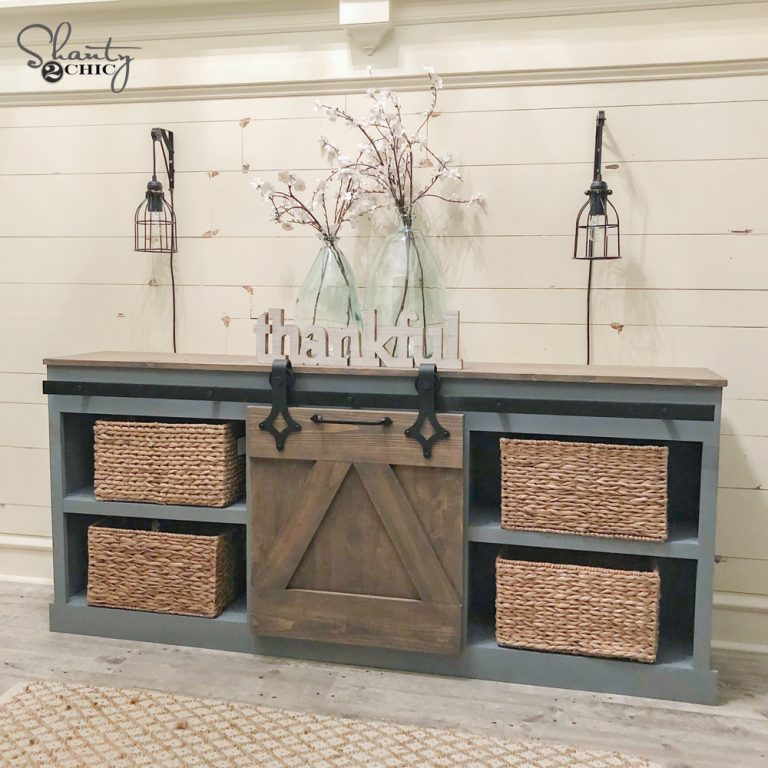
After everything dried I added the hardware. I found the MOST amazing hardware. The best part?? It was under $40! Crazy!You can find it HERE!
And here she is all finished up in my entryway! I’m so happy with how this turned out. The Purdytools really made all the difference in the look and feel of the final product; the paint is smoothand even with no streaking or bubbling.
You can check out theYouTube video tutorial HEREor by clicking the link below!
Before we get started, be sure to download and print theFREE PLANS by clicking HERE!
The first step of this build is to assemble the frame or box. This uses 3/4″ hardwood plywood. I had the guys at the hardware store rip mine to 12″ boards making it easier to get home. Then, I made my cross cuts using my miter saw.
I used my Kreg Jig to make 3/4″ pocket holes on the plywood panels. You can see on the plans where to make all of yours. I attached everything using wood glue and 1.25″ pocket hole screws.
Once you have all of the vertical boards attached, attach the top 1×6 board to the front and top of the box. This will be what hangs the barn door hardware in a later step. Attach this board using wood glue and 1.25″ pocket hole screws.
Now it’s time to attach the bottom trim. Attach the two side pieces first using wood glue and nails, and then attach the long front board also with wood glue and nails.
We are adding the shelves next. These are going to be attached using wood glue and 1.25″ pocket hole screws through the pocket holes on the bottom side of each shelf board.
Next we will add the front trim boards. These are 1×2 that we are attaching with wood glue and finish nails. We like to measure these and cut at this point to get an exact fit. Start with the vertical boards and then measure and cut for the horizontal boards.
Now we are attaching the top board. This is a pine project panel. You can typically find them on the common board aisle at the hardware store. I ripped mine down with my table saw to the correct width, but you can also have the hardware store do that for you. I made the cross cut for the length using my miter saw. Lay this board down with the good side facing the floor and lay the console upside down on top of it. Attach the two using 1.25″ pocket hole screws.
We are building the door next. This is super easy! This is also a pine project panel cut to size, and then we are trimming it using inexpensive pine craft boards. Start with the horizontal boards and then line up the diagonal boards and mark to make a tight fit. Attach these craft boards using wood glue and 5/8″ nails.
And now for the finish… Yeah! This is always the most fun part! It’s amazing how a good coatof paint or stain can change the entire look of a piece. I started by staining the door andconsole top using a Purdy 2.5” Syntox brush, which is a synthetic brush designed specifically forlatex and oil-based stains, paints, varnishes, and clears to provide a smooth, mirror-like andeven finish.
I decided to paint the rest of the console. I used aPurdy NEST 9” Paint Trayand the PurdyRevolution Jumbo Mini Roller Frame with Ultra Finish Roller Covers to make thispart really fast and simple!
To add to the rustic feel, we chose to useHGTV HOME by Sherwin-Williams INFINITY® InteriorComplete One-Coat Paint& Primer in Software (HGSW1463), with a satin finish.
Seriously I LOVE this roller! The microfiber is the bomb and I had the whole cabinet painted in under 30 minutes! It picked up and distributed paint so evenly, I never had to worry about paint dripping, or the roller dragging or catching.
After everything dried I added the hardware. I found the MOST amazing hardware. The best part?? It was under $40! Crazy!You can find it HERE!
And here she is all finished up in my entryway! I’m so happy with how this turned out. The Purdytools really made all the difference in the look and feel of the final product; the paint is smoothand even with no streaking or bubbling.
| Created by | Shanty 2 Chic |
| Price | Free |
| Views | 17 |
Member functions
Login or register to rate, favorite and comment on plans