Bench For Dining Table
Hey guys!
Happy Monday! I hope you all had a great weekend! I got LOTS done and can’t wait to share all the progress I have been making in my garage! Today I am back to share my $20 benches I made to matchmy new outdoor dining table! Yup… You read that right… 20 bucks baby! Woohoo!
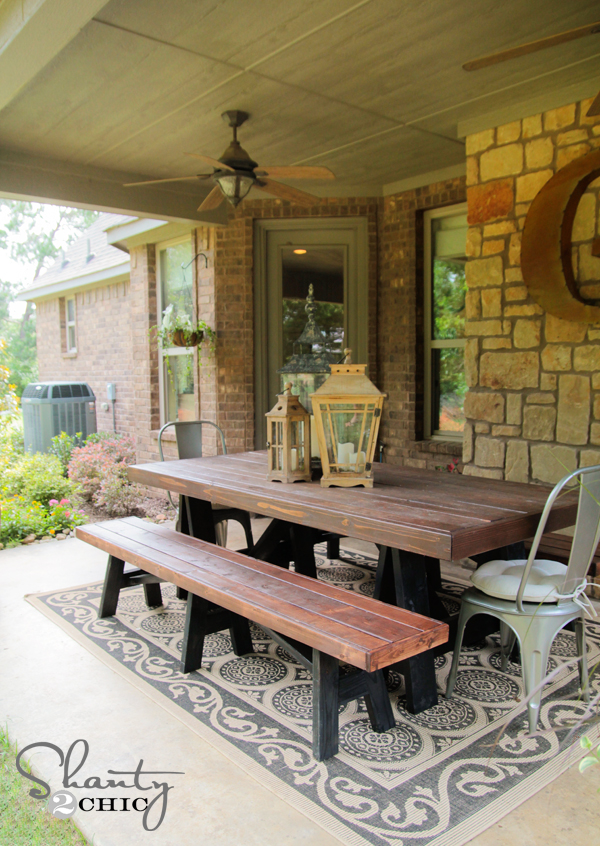
Here is how they turned out!
How cute are those?! I teamed up withMiss Ana Whiteto design these guys and I couldn’t be more happy with them. I will share some tips and tricks with you here, and you can get thefull set of plans over on Ana’s site!
I would totally suggest using aKreg Jigto build these. I used mine on the entire build, and I don’t think I would have built them if I didn’t have one.
I used a 1 1/2″ setting for the drill bit for the entire thing.
Since these benches will be outdoors, I used Kreg’s Blue-Kote screws. These are weather resistant screws that won’t rust. They are amazing screws and I actually use them on lots of different projects that don’t require theKreg Jig.
This is how I did the Kreg Jig pocket holes in the leg pieces…
I made all the legs first and then finished off the rest. I did decide to wrap the top of each bench with 1×4 pine pieces. This made it look beefier and match the table a bit better!
I finished both benches to match the table like this…
I painted all the legs with Rust-Oleum Painters Touch Spray Paint in Semi-gloss black.
For the tops I chose to stain it using a fav of mine!
Rust-Oleum Ultimate Wood Stain in Dark Walnut
This stain is found at Lowe’s and comes in a TON of really great colors! The best part… It dries in under an hour and only requires one coat! Woohoo!
These are the tools I used to stain the top of the benches…
I actually rolled this on because of the size which made it really fast! I filled in the cracks with the foam brush.
Now… To keep this weather proof, I gave the table top three coats of this…
Rust-Oleum Spar Varnish
This stuff is super easy to apply. It dries quickly between coats and doesn’t smell strong when you are applying. It is my new go-to for finishing projects that will be outside! LOVE. You can also find this at Lowe’s.
That’s it! You wan to see a few more pictures?? Me too!
What do you think??
I hope you love them as much as I do! Make sure to check out thefull set of plans over at Ana White’s site!
Thanks so much for coming by! I would love for you to share and PIN this post below! ?
~Whitney
Happy Monday! I hope you all had a great weekend! I got LOTS done and can’t wait to share all the progress I have been making in my garage! Today I am back to share my $20 benches I made to matchmy new outdoor dining table! Yup… You read that right… 20 bucks baby! Woohoo!
Here is how they turned out!
How cute are those?! I teamed up withMiss Ana Whiteto design these guys and I couldn’t be more happy with them. I will share some tips and tricks with you here, and you can get thefull set of plans over on Ana’s site!
I would totally suggest using aKreg Jigto build these. I used mine on the entire build, and I don’t think I would have built them if I didn’t have one.
I used a 1 1/2″ setting for the drill bit for the entire thing.
Since these benches will be outdoors, I used Kreg’s Blue-Kote screws. These are weather resistant screws that won’t rust. They are amazing screws and I actually use them on lots of different projects that don’t require theKreg Jig.
This is how I did the Kreg Jig pocket holes in the leg pieces…
I made all the legs first and then finished off the rest. I did decide to wrap the top of each bench with 1×4 pine pieces. This made it look beefier and match the table a bit better!
I finished both benches to match the table like this…
I painted all the legs with Rust-Oleum Painters Touch Spray Paint in Semi-gloss black.
For the tops I chose to stain it using a fav of mine!
Rust-Oleum Ultimate Wood Stain in Dark Walnut
This stain is found at Lowe’s and comes in a TON of really great colors! The best part… It dries in under an hour and only requires one coat! Woohoo!
These are the tools I used to stain the top of the benches…
I actually rolled this on because of the size which made it really fast! I filled in the cracks with the foam brush.
Now… To keep this weather proof, I gave the table top three coats of this…
Rust-Oleum Spar Varnish
This stuff is super easy to apply. It dries quickly between coats and doesn’t smell strong when you are applying. It is my new go-to for finishing projects that will be outside! LOVE. You can also find this at Lowe’s.
That’s it! You wan to see a few more pictures?? Me too!
What do you think??
I hope you love them as much as I do! Make sure to check out thefull set of plans over at Ana White’s site!
Thanks so much for coming by! I would love for you to share and PIN this post below! ?
~Whitney
| Created by | Shanty 2 Chic |
| Price | Free |
| Visningar | 15 |
Medlemsfunktioner
Login or register to rate, favorite and comment on plans